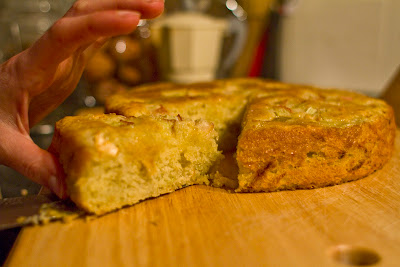
coconut & ginger cake


Nick loves coconut in all shapes and forms. I tend to be able to take it or leave it, but when it's done right, it's just sublime. I also stocked up on creamed coconut a while ago and love trying out all the recipes it can be used in. Creamed coconut comes in blocks like a solid block of lard, and is very oily. It can be dissolved down and used in place of coconut milk in cooking, or used "as is" in place of butter in baking. It's available in most supermarkets and is cheaper than coconut milk both in terms of unit price and by how far it goes when used in cooking.

Unlike my salted caramel coconut cake, this coconut sponge is quite moist, giving the overall cake a richness that is cut through excellently by the sharp-yet-sweet spiciness of ginger, making this an excellent pairing. The ginger butter cream, using fresh ginger juice, is a little more labour-intensive than other frostings, but have patience, it's not only totally worth it, but will also build up your biceps and triceps if you're old-school like me and don't have a food processor with a grater attachment!

This cake doesn't rise very much, so if you want a tall, altogether more impressive cake, double the quantities of the batter ingredients and bake in four tins instead of two. You should only need to increase the amount of frosting by half to accommodate these changes, to 270g butter, 270g icing sugar and 6tbsp ginger juice.

Coconut & Ginger Cake
Ingredients
Cake batter
3 eggs
80g (just over 3oz) unsalted butter, at room temperature
100g (4oz) creamed coconut, at room temperature
150g (3/4 cup) caster sugar
40g dessicated (ground/shredded) coconut
110g (3/4 cup) plain flour
1½ tsp baking powder
pinch of salt

Frosting
180g (7oz) unsalted butter, at room temperature
180g icing (1 cup confectioner's) sugar
~200g / 8oz ginger (LARGE chunk) - you'll need to squeeze 4tbsp of juice from it.

Method
Preheat the oven to 160°C (electric/fan, 180°C gas, gas mark 4, 320-350°F).
Line two 8 inch sandwich tins with baking parchment, or coat with butter/oil and flour if they are springform tins.
Beat the butter, creamed coconut and sugar together until light and fluffy.
Add the eggs one at a time, alternating with a tablespoon of flour, and beating until just combined. 
Gently fold in the remaining ingredients and divide amongst the tins.
Bake in the centre of the oven for approximately 25 minutes, until the centre springs back when pressed, and you can hear a fizzing sound. Cool in the tins for 5-10 minutes before turning out on a wire rack to finish cooling.

To make the buttercream, grate the ginger using a fine grater if possible (the finer the grater the more juice you'll be able to extract).
Squeeze the pulp to extract the juice. If you have a juicer it'll make much lighter work of this process.
Beat the butter and icing (confectioner's) sugar until light and fluffy.
On low speed, beat in 3 tbsp of the ginger juice, 1 tbsp at a time, until just incorporated, being careful not to overmix (or it'll go runny). Have a sneaky taste, and if you can stand more ginger, add the last tablespoon and give it a quick mix. If it's too runny to use straight away, refrigerate for about 30 minutes before s
andwiching the cake together and covering with the frosting.

I've topped the cake shown with finely sliced crystallised ginger, which adds an ever stronger ginger kick, but isn't actually necessary.


Use any remaining juice in cooking, or dilute in a smoothie/cocktail. I have a feeling it would work well with lime juice and a mixer, but I'd avoid putting it directly into milky concoctions as it'd probably curdle!


I *think* they're looking forward to it...


almond & apricot cupcakes

© Lydia, punge.blogspot.co.uk

Apricots are one of my unsung fruit favourites - I forget how much I like them until I have them again, which is rare. It seems to be the season for them at the moment, and while we're not growing any ourselves, they're relatively cheaply available, and make a nice summery addition to any baking repertoire. Apricots pair very well with almonds, but then almonds work with almost anything! Here's an incredibly satisfying recipe for the furry orange soft fruits we so rarely enjoy over here, and while it has several stages which may seem fiddly, it's worth it. If you have plenty of peaches then those will work just as well with the almond cupcakes, and be equally summery :)

© Lydia, punge.blogspot.co.uk
As usual, this recipe is for a batch of 6 cupcakes. It scales up nicely according to your wishes. If you want to make a cake, tripling the recipe and baking in 2 or 3 8inch diameter sandwich tins lined with baking paper (or greased and floured if they are springform) for an equal amount of time as the cupcakes, should do the trick.


Almond & Apricot Cupcakes
Ingredients
© Lydia, punge.blogspot.co.uk
Almond Cupcake batter (6)
40g caster sugar (slightly less than 1/4 cup, which would be 50g)
50g (2oz, 1/2 stick) butter or margarine
1 large egg
55g (generous 1/2 cup) self raising flour
40g (1/4 cup) ground almonds
1 tsp almond essence
pinch of salt

Apricot buttercream
2 apricots (approx 80g of flesh), chopped
100g (4 oz, 1 stick) unsalted butter
180g icing (1 cup confectioner's) sugar

Method
© Lydia, punge.blogspot.co.uk
Preheat the oven to 160°C (electric/fan, 180°C gas, gas mark 4, 320-350°F)

Line a muffin tin with 6 muffin cases

Beat the butter and sugar together until light and fluffy.
Beat in the egg
fold in the remaining ingredients
Divide among the cases (approx 35g / 3tbsp per case)
Bake for 20-25 minutes until risen, slightly golden and firm to the touch. A toothpick will come out clean and you'll hear a fizzing sound.
Allow to cool completely before frosting.

To make the frosting, fry the apricots in 1tsp of the butter till soft and slightly caramelised, about 5 minutes. Mash with a fork/spatula to loosen any remaining lumps.
Beat the remaining butter with the icing sugar until light and fluffy.
Beat in the softened, cooled apricots and pipe onto your cupcakes, before devouring in a satisfyingly gluttinous frenzy.

© Lydia, punge.blogspot.co.uk

a film for you!


Eagle-eyed among you will have spotted that most of my photos are taken by Nick Loven, my wonderful boyfriend and fantastic director/producer/head honcho of Crow's Eye Productions. On top of all these things, he's a massive nerd and has a real thing for Dr. Who, as do (and are) a lot of his friends, several of which are talented script writers to boot. They got together with the Loven family (Nick's uncle on sound and Nick's mum on costumes) and made a fantastic Dr. Who fan film, "The Mystery of Rorrim".

After months and months and months of hard graft, which included serious costumery by Pauline at Orchard House Wardrobe (check them out too, particularly if you are a fan of period costumes, the historical accuracy of period clothing right down to the last miniscule and expertly executed detail are breathtakingly astounding - real "period-costume porn" going on there!), the film is finally ready for full release, and you can watch it in all its splendid glory, totally free!

Enjoy, heartily, there will be cake next week (promise!) and for those of you that love it, yes, there's a second one on the way - filming starts this very day!


sticky rhubarb drizzle cake

© Nick Loven

With two stalks of rhubarb from our neighbours remaining, Nick came up with the bright idea of rhubarb drizzle cake, extracting rhubarb juice by cooking it, and using it in a similar way as lemon juice in a lemon drizzle tray bake. We love the way drizzle cake typically has a crunchy topping and tried to replicate that here, but rhubarb juice obtained by cooking rhubarb is very thick, so instead of sinking into the cake leaving only the sugar crystallising on top, it leaves a thicker, glossy glaze on the cake top, making it incredibly sticky and moist. An ice cold glass of milk cuts through the stickiness perfectly, and as there's no additional frosting, you don't have to wait for the cake to cool completely before digging in.


© Nick Loven
N&L's Sticky Rhubarb Drizzle Cake
Ingredients
300g (2 stalks) rhubarb
225g (9oz) butter or margarine
225g (1 cup) sugar
4 eggs*
250g (1 3/4 cup) self-raising flour
* I have it on good authority (thanks Mattijs!) that if you only have 2 eggs that will work if you add some milk (half a cup or more) to your batter too, it'll be slightly denser than here.

Method
Chop the rhubarb into 1cm chunks and place 250g (set aside the rest for later) of it in a pan on a medium heat, covered, for approximately 10 minutes. Strain gently through a sieve - you don't need to squeeze it.
Keep both the juice (it will yield approximately 50g) and pulp for use in the recipe.

Preheat the oven to 160°C (electric/fan, 180°C gas -mark 4, 320-350°F) and oil and flour an 8 inch cake tin (or line a 20cm square tin with baking parchment).
Beat the butter and sugar until light and fluffy. 
Add the eggs one at a time while beating, adding a little of the flour between additions of egg if the mixture becomes too runny.
Fold in the flour and rhubarb pulp from the juice extraction process. The batter should have a good dropping (but not pouring) consistency, if it is too thick, add a little of the extracted rhubarb juice.
Pour the batter into the prepared tin and smooth the top. Place the chopped rhubarb on the top and bake for 45 minutes, until the top is golden and the centre is firm. You should be able to hear a fizzing sound.

While the cake is in the oven, prepare the rhubarb drizzle by mixing the rhubarb juice with an equal weight of sugar (I had 56g - approximately 2oz of each). 
When the cake is cooked, remove it from the oven and immediately skewer and spoon the rhubarb drizzle over the top. 
Leave the cake in the tin to cool, at least slightly - if you're in a rush then 10 minutes in the fridge should do it!

© Nick Loven

rhubarb bake

© Lydia, punge.blogspot.co.uk

Rhubarb season is coming to a close at the allotment, and while all of ours has failed to grow, our neighbours have been very generous with theirs. Here's a moist and chewy cake, inspired by a traditional Jewish-Polish cake that's usually made with apples (but works wonderfully with plums, and now also rhubarb) that doesn't need frosting (but you always could), making it perfect for cutting into chunks and taking for picnics. The masses of cinnamon make for incredibly homely smells while baking too. Make sure you use a high sided (>5ish cm) tin for baking it in, or line with greaseproof paper to a height greater than this, and place a baking sheet on the shelf below to catch any overspill - the batter looks flat but the cake rises and rises in the oven. Save any that does overflow - it's delicious!

© Lydia, punge.blogspot.co.uk
Lydia's Rhubarb Upside-Down Bake
Ingredients
Batter
150g (1 cup) plain flour
240g (1 cup) caster sugar
2 large eggs
160ml (2/3 cup) apple juice
120ml (1/2 cup) vegetable oil (canola oil)
1tbsp ground cinnamon
1tsp vanilla extract
1tbsp and 1.5tsp baking powder

© Lydia, punge.blogspot.co.uk
Rhubarb filling
240g (8.3oz, roughly 2 stalks) rhubarb, cut into chunks
1tbsp ground cinnamon
1 tbsp ground ginger
1 tbsp caster sugar

Optional Icing
45g (1/4 cup confectioner's) icing sugar
up to 1.5tsp lemon/lime juice


Method
Preheat the oven to 160°C (electric/fan, 180°C gas -mark 4, 320-350°F).  Line an 8 inch round tin / 20cm square tin with baking parchment to give a height of at least 6cm. If you have a springform pan with tall enough sides, buttering/oiling and flouring the tin will be sufficient.

Combine all the ingredients for the batter - beat until well combined, it will look quite elastic and flat, similar to pancake batter.
Place the rhubarb filling ingredients in a bowl and toss until all the rhubarb is well coated.

Place half the batter in the bottom of the baking tin and tilt the tin to allow the batter to roll its way to the edges. 
Place the rhubarb pieces on top and drizzle the rest of the batter on top to cover the rhubarb. 
Finally top with the remaining cinnamon/ginger/sugar mix that didn't stick on the rhubarb (there'll be quite a lot of it!) - when the cake is done it'll be turned upside-down and this sprinkling will be on the bottom, and the first thing to hit your tongue when you eat it!


© Lydia, punge.blogspot.co.uk


Bake for 40-45 minutes, you'll hear a fizzing sound when it's done and the top will spring back. Don't worry that it's sunk in the middle - that's perfectly normal for this cake. 
Cool in the tin for 10 minutes before transferring, upside-down to a wire rack to finish cooling. 
Be careful when removing the paper / bottom of the springform tin from the cake, as the rhubarb will have sunk and will be sticking - use a knife / spatula and patience. 
Dust the top side (what was the bottom of the cake while baking) with icing sugar or drizzle with a glaze (add lemon juice a 1/4 teaspoon at a time to about 1/4cup confectioner's sugar, mixing, until you reach a drizzly icing consistency) . Also works well served with cream or ice-cream.


© Lydia, punge.blogspot.co.uk